Tuesday, 29 October 2013

REST WCF Service

Introduction

Windows Communication Foundation (WCF) is an SDK for developing and deploying services on Windows. WCF provides a runtime environment for your services, enabling you to expose CLR types as services, and to consume other services as CLR types. In this article, I am going to explain how to implement restful service API using WCF 4.0 . The Created API returns XML and JSON data using WCF attributes.

What is REST?

Based on the Roy Fielding theory "Representational State Transfer (REST), attempts to codify the architectural style and design constraints that make the Web what it is. REST emphasizes things like separation of concerns and layers, statelessness, and caching, which are common in many distributed architectures because of the benefits they provide. These benefits include interoperability, independent evolution, interception, improved scalability, efficiency, and overall performance."
Actually only the difference is how clients access our service. Normally, a WCF service will use SOAP, but if you build a REST service, clients will be accessing your service with a different architectural style (calls, serialization like JSON, etc.).
REST uses some common HTTP methods to insert/delete/update/retrieve information which is below:
  1. GET - Requests a specific representation of a resource
  2. PUT - Creates or updates a resource with the supplied representation
  3. DELETE - Deletes the specified resource
  4. POST - Submits data to be processed by the identified resource

Why and Where to Use REST?

Few days back, I was writing a service which was supposed to be accessed by heterogeneous language/platform/system. It can be used by iPhone, Android, Windows Mobile, .NET web application, JAVA or PHP. Using web service, it was bit complex for me to expose it to everyone using uniform system. Then we decided to use REST, which was easily espoused over cloud. This was a great example which shows the capability of SIMPLE RESTful SERVICE :). Below are some points which will help you to understand why to use the RESTful services.
  1. Less overhead (no SOAP envelope to wrap every call in)
  2. Less duplication (HTTP already represents operations like DELETEPUTGET, etc. that have to otherwise be represented in a SOAP envelope).
  3. More standardized - HTTP operations are well understood and operate consistently. Some SOAP implementations can get finicky.
  4. More human readable and testable (harder to test SOAP with just a browser).
  5. Don't need to use XML (well, you kind of don't have to for SOAP either but it hardly makes sense since you're already doing parsing of the envelope).
  6. Libraries have made SOAP (kind of) easy. But you are abstracting away a lot of redundancy underneath as I have noted. Yes, in theory, SOAP can go over other transports so as to avoid riding atop a layer doing similar things, but in reality just about all SOAP work you'll ever do is over HTTP.

Step by Step Guide

Generally, a developer is scared to use WCF because of a lot of confusing configuration. I will try to use minimum configuration so that it will be easier to understand for us. We will develop Restful WCS API in 6 steps. So let’s start now.

STEP 1

First of all launch Visual Studio 2010. Click FILE->NEW->PROJECT. Create new "WCF Service Application".

STEP 2

Once you create the project, you can see in solution that By Default WCF service and interface file are already created. Delete By default created file as we will create our own interface and WCF service file.

STEP 3

Now right click on solution and create one new WCF service file. I have given name to the service file as “RestServiceImpl.svc”.

STEP 4

As I explained at the start of the article that we will be writing an API which can return data in XML and JSON format, here is the interface for that. In IRestServiceImpl, add the following code:

In the above code, you can see two different methods of IRestService which are XMLData and JSONData.XMLData returns result in XML whereas JSONData in JSON.

STEP 5

Open the file RestServiceImpl.svc.cs and write the following code over there:

STEP 6

Now let’s move to configuration part which is the last one. There will be two basic parts of the configurations file which we must have to understand.
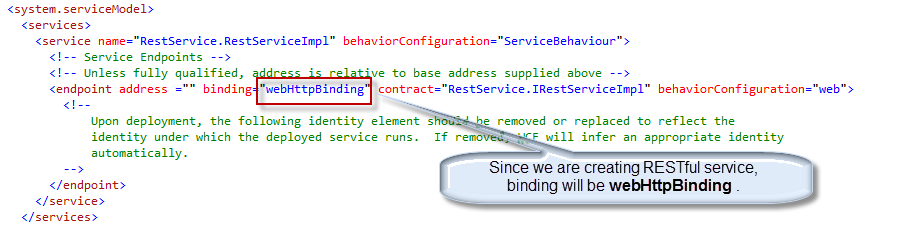
<services> 
This part contains information about the End Point. Below are the code details.
Click to enlarge image
<behaviors>
This part contains details about service and endpoint behavior.

And that’s it. Our Restful WCF service is ready for test purposes.

Service Ready to Test Now

Now I launch the application in the browser to see the result. I launch this service in Internet Explorer and my URL is now http://localhost:35798/RestServiceImpl.svc. Now if I use http://localhost:35798/RestServiceImpl.svc/xml/123 URL, I get the following response on the browser which is an XML format and that was my task to achieve.

Now if I use http://localhost:35798/RestServiceImpl.svc/json/123 URL, I get the following response on the browser which is an XML format and that was my task to achieve.


Thursday, 24 October 2013

Install SQL server 2008

How to Install SQL server 2008 on Windows 7

 Now I am going to show How to Install Microsoft SQL Server 2008 Express Edition.

First you need the installer, download it from here.
Requirements:
Visual Studio 2010 or VS 2008 SP1
Step 1: Double click on the installer. It will take some time to extract. After that an window  will open as follow.
First window of installation
Step 1
Step 2: From this window click on the Installation menu (See Left). Now there will be appear some option under Installation. From right, click on the option New SQL Server stand-alone installation or add features to an existing installation.
Note: After Clicking on that a window may appear as bellow. Just click on the button Run Program of that.
Click Run Program
Note
Step 3: Now setup will take a moment to complete some operation. To continue there can not be any operation with status failed. If any operation fails then it will not be possible to continue installation. Click OK
Every operation should be passed
Step 4
Step 4: This is express edition so I do not need to enter any product key. Just Click on Next
Next
Step 4
Step 5: Check Accept the terms and click NEXT
Check Accept Terms & Condition and Click Next
Step 5
Step 6: Now Click Install button. Some setup support files will be installed.
Install Setup Support Files
Step6
Step 7: Now again It needs some operation to be completed. Every operation must be  passed or warning or skipped. If any operation fails then it is not possible to continue. Click Next.
There can not be any operation with failed status
Step 7
Step 8: Now select the features which do you need. Here I am selecting Database Engine Services, Busines Intelligence Development Studio, Management Tools basic & SQLl Client Connectivity SDK. Click Next.
Select Services
Step 8
Step 9: Here we need the name and instance ID. I am selecting Default Instance but keep the name “SQLExpress” in your mind for future use. Click Next.
Check Default instance
Step 9
Step 10: Now a window will appear  and it will show the space required and available. Click Next.
Click Next
Step 10
Step 11: Here select the account name from the dropdown list for SQL Server Database Engine-
NT AUTHORITY\NETWORK SERVICE and Click Next.
Select NT AUTHORITYNETWORK SERVICE
Step 12: Now select which mode do you want to use. Here I am selecting the Mixed mode.
For mixed mode I have to provide the password for the root account (username “sa” default) and adding my current user by which i will also be able to access database engine without default administrator account (username : sa ).
Select NT AUTHORITY\NETWORK SERVICE
Step 12
Step 13: Click Next
Click Next
Step 13
Step 14: Now again every operation must be passed or skipped. If there is any operation with status failed then installation will not be possible. Click Next
There must not be any operation with status failed.
Step 14
Step 15: Now finally it is going to start the installation. Click Install
Start Installation
Step 15
Step 16: Now wait till installation is complete. Setup is complete. Click Next
Next
Step 16
Step 17: Now Close this window
Close
Close
Exit this
Exit this
At last Exit this window
Installation is complete.Install SQL Server 2008 SP1. If you face any problem just let me know.

Tuesday, 22 October 2013

jQuery Tutorial for Beginners

Link to jQuery's Source Code Remotely

This is an optional technique that many developers are using today. Instead of hosting the jQuery source code on
your own server, you can link to it remotely. This ensures the fastest possible download time of the source code, since
many users visiting your site might have the file already cached in their browser. Here is how your <script> tag should
look:
<script type="text/javascript"
src="http://ajax.googleapis.com/ajax/libs/jquery/1.4.0/jquery.min.js?ver=1.4.0"></script>

Running Code Unobtrusively When the DOM is Ready

The first thing you need to be up and running with jQuery is what’s called the “document ready” handler. Pretty much
everything you code in jQuery will be contained inside one of these. This accomplishes two things: First, it ensures
that the code does not run until the DOM is ready. This confirms that any elements being accessed are actually in
existence, so the script won’t return any errors. Second, this ensures that your code is unobtrusive. That is, it’s
separated from content (XHTML) and presentation (CSS).
Here is what it looks like:
$(document).ready(function() {
// all jQuery code goes here
});
Although you will normally include your jQuery code inside the above handler, for brevity the rest of the code

Selecting Elements in jQuery

The jQuery library allows you to select elements in your XHTML by wrapping them in $("") (you could also use single
quotes), which is the jQuery wrapper. Here are some examples of “wrapped sets” in jQuery:

$("div"); // selects all HTML div elements
$("#myElement"); // selects one HTML element with ID "myElement"
$(".myClass"); // selects HTML elements with class "myClass"
$("p#myElement"); // selects HTML paragraph element with ID "myElement"
$("ul li a.navigation");
// selects anchors with class "navigation" that are nested in list items

jQuery supports the use of all CSS selectors, even those in CSS3. Here are some examples of alternate selectors:


$("p > a"); // selects anchors that are direct children of paragraphs
$("input[type=text]"); // selects inputs that have specified type
$("a:first"); // selects the first anchor on the page
$("p:odd"); // selects all odd numbered paragraphs
$("li:first-child"); // selects each list item that's the first child in its list
jQuery also allows the use of its own custom selectors. Here are some examples:
$(":animated"); // selects elements currently being animated
$(":button"); // selects any button elements (inputs or buttons)
$(":radio"); // selects radio buttons
$(":checkbox"); // selects checkboxes
$(":checked"); // selects checkboxes or radio buttons that are selected
$(":header"); // selects header elements (h1, h2, h3, etc.)


Manipulating and Accessing CSS Class Names

jQuery allows you to easily add, remove, and toggle CSS classes, which comes in handy for a variety of practical
uses. Here are the different syntaxes for accomplishing this:
$("div").addClass("content"); // adds class "content" to all <div> elements
$("div").removeClass("content"); // removes class "content" from all <div> elements
$("div").toggleClass("content");
// toggles the class "content" on all <div> elements (adds it if it doesn't exist, //
and removes it if it does)

You can also check to see if a selected element has a particular CSS class, and then run some code if it does. You
would check this using an if statement. Here is an example:
if ($("#myElement").hasClass("content")) {
// do something here
}
You could also check a set of elements (instead of just one), and the result would return "true" if any one of the
elements contained the class.

Manipulating CSS Styles with jQuery

CSS styles can be added to elements easily using jQuery, and it's done in a cross-browser fashion. Here are some
examples to demonstrate this:
$("p").css("width", "400px"); // adds a width to all paragraphs
$("#myElement").css("color", "blue") // makes text color blue on element #myElement
$("ul").css("border", "solid 1px #ccc") // adds a border to all lists
Adding, Removing, and Appending Elements and Content
There are a number of ways to manipulate groups of elements with jQuery, including manipulating the content of
those elements (whether text, inline elements, etc).
Get the HTML of any element (similar to innerHTML in JavaScript):
var myElementHTML = $("#myElement").html();
// variable contains all HTML (including text) inside #myElement
If you don't want to access the HTML, but only want the text of an element:
var myElementHTML = $("#myElement").text();
// variable contains all text (excluding HTML) inside #myElement
Using similar syntax to the above two examples, you can change the HTML or text content of a specified element:
$("#myElement").html("<p>This is the new content.</p>");
// content inside #myElement will be replaced with that specified
$("#myElement").text("This is the new content.");
// text content will be replaced with that specified
To append content to an element:
$("#myElement").append("<p>This is the new content.</p>");
// keeps content intact, and adds the new content to the end
$("p").append("<p>This is the new content.</p>");
// add the same content to all paragraphs
jQuery also offers use of the commands appendTo(), prepend(), prependTo(), before(), insertBefore(), after(), and
insertAfter(), which work similarly to append() but with their own unique characteristics that go beyond the scope of
this simple tutorial.

Dealing with Events in jQuery

Specific event handlers can be established using the following code:
$("a").click(function() {
// do something here
// when any anchor is clicked
});
The code inside function() will only run when an anchor is clicked. Some other common events you might use in
jQuery include:
blur, focus, hover, keydown, load, mousemove, resize, scroll, submit, select.
Showing and Hiding Elements with jQuery
The syntax for showing, hiding an element (or toggling show/hide) is:
$("#myElement").hide("slow", function() {
// do something once the element is hidden
}
$("#myElement").show("fast", function() {
// do something once the element is shown
}
$("#myElement").toggle(1000, function() {
// do something once the element is shown/hidden
}
Remember that the "toggle" command will change whatever state the element currently has, and the parameters are
both optional. The first parameter indicates the speed of the showing/hiding. If no speed is set, it will occur instantly,
with no animation. A number for "speed" represents the speed in milliseconds. The second parameter is an optional
function that will run when the command is finished executing.
You can also specifically choose to fade an element in or out, which is always done by animation:
$("#myElement").fadeOut("slow", function() {
// do something when fade out finished
}
$("#myElement").fadeIn("fast", function() {
// do something when fade in finished
}
To fade an element only partially, either in or out:
$("#myElement").fadeTo(2000, 0.4, function() {
// do something when fade is finished
}
The second parameter (0.4) represents "opacity", and is similar to the way opacity is set in CSS. Whatever the opacity
is to start with, it will animate (fadeTo) until it reaches the setting specified, at the speed set (2000 milliseconds). The
optional function (called a "callback function") will run when the opacity change is complete. This is the way virtually
all callback functions in jQuery work.

jQuery Animations and Effects

You can slide elements, animate elements, and even stop animations in mid-sequence. To slide elements up or
down:
$("#myElement").slideDown("fast", function() {
// do something when slide down is finished
}
$("#myElement").slideUp("slow", function() {
// do something when slide up is finished
}
$("#myElement").slideToggle(1000, function() {
// do something when slide up/down is finished
}
To animate an element, you do so by telling jQuery the CSS styles that the item should change to. jQuery will set the
new styles, but instead of setting them instantly (as CSS or raw JavaScript would do), it does so gradually, animating
the effect at the chosen speed:

$("#myElement").animate({opacity: .3,width: "500px",height: "700px"}, 2000, function() {// optional callback after animation completes});
Animation with jQuery is very powerful, and it does have its quirks (for example, to animate colors, you need a special
plugin). It's worth taking the time to learn to use the animate command in-depth, but it is quite easy to use even for
beginners.

Wednesday, 16 October 2013

WCF Walkthrough

WCF EndPoint

WCF Service is a program that exposes a collection of Endpoints. Each Endpoint is a portal for communicating with the world.
All the WCF communications are take place through end point. End point consists of three components.

Address

Basically URL, specifies where this WCF service is hosted .Client will use this url to connect to the service. e.g
http://localhost:8090/MyService/SimpleCalculator.svc

Binding

Binding will describes how client will communicate with service. There are different protocols available for the WCF to communicate to the Client. You can mention the protocol type based on your requirements.
A binding has several characteristics, including the following:
  • Transport -Defines the base protocol to be used like HTTP, Named Pipes, TCP, and MSMQ are some type of protocols.
  • Encoding (Optional) - Three types of encoding are available-Text, Binary, or Message Transmission Optimization Mechanism (MTOM). MTOM is an interoperable message format that allows the effective transmission of attachments or large messages (greater than 64K).
  • Protocol(Optional) - Defines information to be used in the binding such as Security, transaction or reliable messaging capability
The following table gives some list of protocols supported by WCF binding.
BindingDescription
BasicHttpBindingBasic Web service communication. No security by default
WSHttpBindingWeb services with WS-* support. Supports transactions
WSDualHttpBindingWeb services with duplex contract and transaction support
WSFederationHttpBindingWeb services with federated security. Supports transactions
MsmqIntegrationBindingCommunication directly with MSMQ applications. Supports transactions
NetMsmqBindingCommunication between WCF applications by using queuing. Supports transactions
NetNamedPipeBindingCommunication between WCF applications on same computer. Supports duplex contracts and transactions
NetPeerTcpBindingCommunication between computers across peer-to-peer services. Supports duplex contracts
NetTcpBindingCommunication between WCF applications across computers. Supports duplex contracts and transactions

Contract

Collection of operation that specifies what the endpoint will communicate with outside world. Usually name of the Interface will be mentioned in the Contract, so the client application will be aware of the operations which are exposed to the client. Each operation is a simple exchange pattern such as one-way, duplex and request/reply.
Below figure illustrate the functions of Endpoint

Example:

Endpoints will be mentioned in the web.config file on the created service.
<system.serviceModel>
<services>
      <service name="MathService"
        behaviorConfiguration="MathServiceBehavior">
       <endpoint
         address="http://localhost:8090/MyService/MathService.svc" contract="IMathService"
          binding="wsHttpBinding"/> 
      </service>
    </services>
    <behaviors>
      <serviceBehaviors>
        <behavior name="MathServiceBehavior">
          <serviceMetadata httpGetEnabled="True"/>
          <serviceDebug includeExceptionDetailInFaults="true" />
        </behavior>
      </serviceBehaviors>
    </behaviors>
  </system.serviceModel>